THIS EDITORIAL PLANS TO ENCOMPASS ALL OF THE INFORMATION YOU WILL NEED TO MAKE INFORMED DECISIONS REGARDING THE BEST UPGRADE PATH FOR YOUR VEHICLE.
Hello and welcome to our Op-Ed on the 2015+ Subaru WRX! In this editorial, we will be discussing our background with the FA20DIT platform as it relates to part testing and ECU calibration as well as covering why the information in this article may be of use to you!
We will also be giving an in-depth overview of the following topics: Intakes, Bypass Valves, Turbo Inlets, Electronic Boost Control Solenoids, Turbochargers, Intercoolers / Charge Pipes, Intake Manifolds, Tumble Generator Valves, Engine Builds, Downpipes, Cat-Back Exhausts / Muffler Deletes, Air-Oil Separators, Powertrain / Drivetrain Bracing, Suspension Upgrades, Braking Upgrades, Transmission Swaps, Clutch Upgrades, Ethanol Sensors, Low / High-Pressure Fuel Pumps, and Alternative Fuels (Methanol / Ethanol). This overview will consider the purpose of each component, how to account for it in a calibration file, as well as what specific brands we recommend.
Disclaimer:
The statements made in this article are subjective and based on our knowledge and experience gained from working with the VA WRX platform. Please refer to your preferred tuner, or a trusted vendor, for recommendations on your specific setup.
Intentions:
This Op-Ed is intended to help the user better understand how certain modifications affect the engine and performance, what tuning changes are necessary to account for these modifications, and what brand(s) we recommend for each modification category. This is NOT intended to be a tuning guide. We are NOT experts in ANY category that will be discussed.
OUR BACKGROUND
VA WRX (FA20DIT) PLATFORM
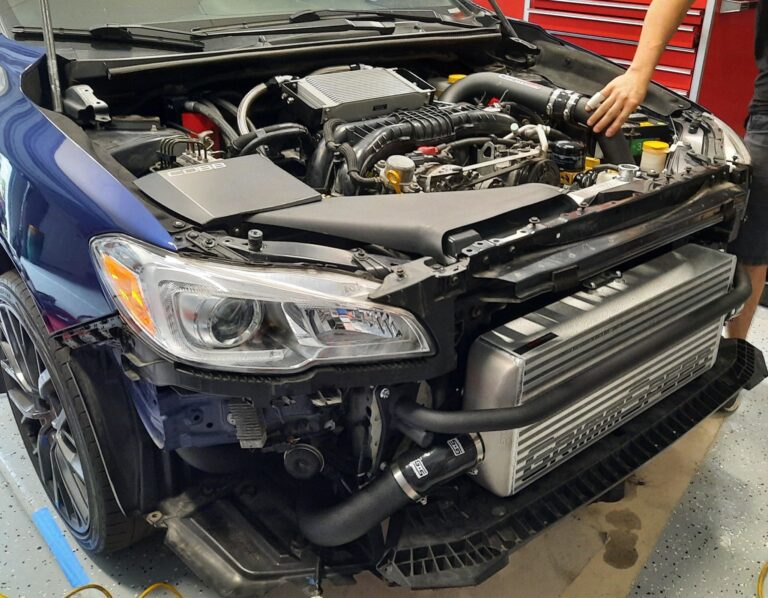
We have owned a 2016 Subaru WRX for almost 4 years now. In that time, we have done many modifications, tested different brands and components, and spent quite a few hours on the track. Our experience in setups and tuning is currently specialized within this specific platform. However, we do hope to branch out to other platforms in the future.
Part Testing

Ever since we began ownership of our 2016 WRX, modifications have been a way of life. Whether it’s increasing power or decreasing detonation, the aftermarket industry has played a big role in shaping our vehicle into what it is today. Brands like COBB and GrimmSpeed (and many others) have made giant leaps on the VA WRX platform by providing not only performance parts but the means to control the ECU (Engine Control Unit) calibration as well. Since we started tuning, we have compared and contrasted many different parts on our own vehicle in an effort to provide insight into what parts may be best for any given setup and what parts could have their cost better spent elsewhere.
ECU Calibration
At the start of 2020, we began studying ECU tuning. Our platform of choice was the 2015+ Subaru WRX (FA20DIT). We were inspired to choose this platform by legendary Subaru tuners such as Jr, Botti, Ambot, Adkins, Bains, Shinji, and many others. Since we already owned the vehicle, it was a great place for us to start.
Through COBB’s software support and High Performance Academy, we learned the basics of ECU calibration and how to apply them to our own vehicle. After many revisions and countless hours of testing, we had our engine performing as close to optimally as we could. From there, we reached out to friends on the same platform and began tuning their cars. We immediately fell in love with the idea of tuning in general. Coming from an engineering background, we had a good fundamental understanding of how an internal combustion engine operated and what was required to make it function optimally.
From our friend’s cars, we branched out to Facebook forums and other mediums with the intention of making quality calibrations attainable for the masses. This included not only making tuning affordable but also being transparent and allowing customers to learn about the changes that are being made to their vehicles as opposed to keeping them in the dark. Knowledge is power and spreading that knowledge is the main goal behind this Op-Ed and our tuning career in general. The support we have gotten from the community, as a whole, has been outstanding and we are excited each and every day for the ability to be able to share our passion with others.
MODIFICATIONS AND PREFERRED BRANDS
Intakes
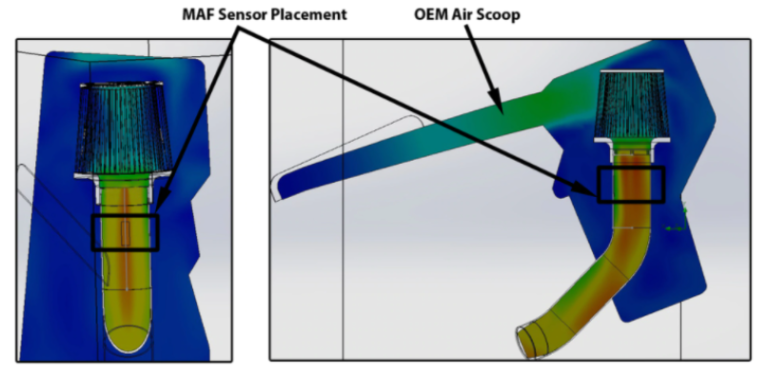
As the primary point of entry for air into your engine, an intake is very important. An intake can either encourage healthy airflow, or restrict it. A good intake will also protect against heat and water as the vehicle is piloted through a variety of different operating, weather, and road conditions. The OEM (Original Equipment Manufacturer) intake is sufficient for the majority of simple setups. With a flexible design and a 2.5” MAF (Mass Air Flow) housing, the OEM intake has been proven to work well, even at higher power levels. However, people prefer the turbo noise to be amplified. Hence, an intake is one of the most common modifications out there.
Some key considerations to make when sourcing an intake are as follows. What is the pipe diameter? Pipe diameter will either encourage or restrict air flow depending on pipe size and bend geometry. Is the MAF sensor housing different? The MAF sensor housing will affect how air is calculated as it passes through the sensor. How does the intake control temperature and protect against moisture ingestion? An intake with a heat shield is the best way to protect usable air from radiant heat. It also can protect against water as it splashes up into the engine bay during inclement conditions.
Tuning changes for an aftermarket intake generally revolve around properly scaling the MAF sensor to ensure that the proper amount of air is being accounted for as it enters the engine. If this sensor is improperly calibrated, the ECU will compensate by adding or removing fuel, as necessary, as determined by the measured AFR (Air Fuel Ratio) at the wideband O2 (Oxygen) sensor during closed-loop operation. Not accounting for an intake during tuning can result in elevated fuel trims and generally erratic fueling, which can lead to bigger issues down the line.
For an intake, we recommend the GrimmSpeed StealthBox. We have had great results testing with this unit. The GrimmSpeed Intake has a well engineered plumbing design that has proven viable at both stock and elevated power levels. On top of that, it simply has superior fit and finish, in my opinion. The GrimmSpeed unit also has a clever design that eliminates any guesswork when placing the air filter. This means that there is more consistency from one setup to the next. This is the intake that we use on our vehicle and it’s the only one we will consistently recommend for most MAF based builds. You can check it out using the link(s) for GrimmSpeed StealthBox Intake.
Bypass Valves
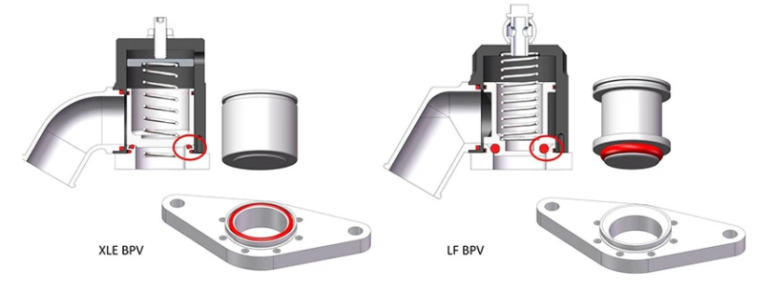
A bypass valve is important, especially for the FA20DIT which utilizes a fully recirculating air flow path to accurately account for all air in the system. Instead of venting excess air into the atmosphere like a traditional BOV (Blow Off Valve), the BPV (Bypass Valve) will recirculate excess air back into the intake tract. This allows for the correct amount of air in the system to be preserved, especially during transient operating conditions. The OEM BPV is sufficient for most applications. However, it is plastic and prone to failure over time.
Some key considerations to make when sourcing a BPV are as follows. Does the unit recirculate 100% of the excess air? If it does not, then you should look at a unit that does. From a conceptual standpoint, if air is accounted for and then lost, the engine will be expecting more air than it will receive. This will cause a rich condition, which is not optimal for most situations. Does the unit leak? A BPV that leaks can cause a wide variety of operating concerns as the continuity in the system is no longer preserved.
Installing a fully recirculating BPV requires no general tuning changes. However, installing a VTA BOV unit may require tuning adjustments to switch over from a MAF based fueling strategy to a SD (Speed Density) or VE (Volumetric Efficiency) based fueling strategy. Nevertheless, it is best to discuss the application of a hybrid or fully VTA charge pressure release system with your preferred tuner.
For a bypass valve, we recommend the GrimmSpeed BPV. This unit is fully recirculating and does not require any tuning changes to install. Like most things that GrimmSpeed designs and manufactures, form and function are both equally prioritized. Not only does this unit look sleek, it is also rated for nearly double the pressure of the OEM unit. This means that the chance of failure is significantly lower, when using a GrimmSpeed BPV, compared to other units on the market. You can check it out using the link(s) for GrimmSpeed Bypass Valve.
Turbo inlets
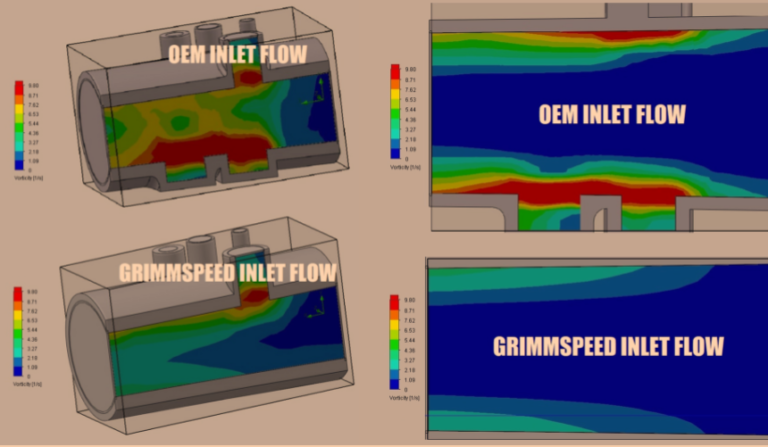
A turbo inlet is a critical intake tract component that allows air to transfer smoothly from the intake plumbing to the turbo. By design, the unit should flow as freely as possible and provide an ample seal between the components it bridges. For this reason, resilience is key. The OEM inlet is sufficient for most applications. However, it is plastic and prone to failure over time. It is also designed to lightly tumble air as it enters the compressor housing of the turbo. This may or may not be desirable depending on your specific situation.
Some key considerations to make when sourcing a turbo inlet are as follows. Does the unit flow air laminarly? Laminar (non-turbulent) flow will be more efficient and predictable when compared to turbulent (interrupted) flow. Does the unit provide an ample seal from the intake to the turbo? If not, then a vacuum leak will be introduced. Is the unit resilient? If not, it may fail over time due to heat and stress.
Installing a turbo inlet requires no general tuning changes. However, it is best to share a post-install log with your preferred tuner so that any potential air leaks can be identified and corrected.
For a turbo inlet, we recommend the GrimmSpeed inlet. This unit is cast aluminum and features both optimal flow characteristics and resilience. With this unit, we have seen a zero-percent failure rate thus far, and we have absolute faith that this metric will continue. It is also priced considerably competitively compared to most other viable aftermarket options. Keep in mind that, due to emissions updates in 2017, you will need to select the correct turbo inlet for your vehicle’s model year. You can check them out using the link(s) for GrimmSpeed Turbo Inlet (2015-2016) and GrimmSpeed Turbo Inlet (2017-2021).
ELECTRONIC BOOST CONTROL SOLENOIDS

An EBCS (Electronic Boost Control Solenoid) is a crucial tuning component as it allows the boost pressure to be accurately controlled via wastegate. This prevents surges, spikes, and irregularities, while also facilitating more consistency across the board. A well set up boost control system can result in more horsepower and better drivability overall. The FA20DIT is equipped with a 2-Port EBCS from the factory. However, the aftermarket 3-Port options typically perform much better.
In order to understand how an EBCS works, we need to understand how the Subaru boost control system functions. Programmed into the ECU is a P/I (Proportional / Integral) gain system which operates in a closed-loop at all times. This means that there is a constant comparison between the target boost and the manifold relative pressure or boost pressure. This comparison will always result in an error. This error is calculated via the following equation: [Boost Error] = [Target Boost] – [Manifold Relative Pressure]. This means that a positive boost error value indicates under-boosting and a negative value indicates over-boosting. The ECU will take this value and apply a WGDC (Wastegate Duty Cycle) multiplier in order to fine-tune the boost control system on the fly – in the same way, that the ECU will use an AFR (Air Fuel Ratio) error to adjust fueling in closed-loop operation. Setting up this system to perform effectively is as simple as understanding how a P/I system is optimized. Minimizing overshoot and downtime are the two key aspects to enhancing the performance of any boost control system. Coincidently, these are the two main reasons why an EBCS is such a powerful tool, since it allows the user greater control over those two functions.
Some key considerations to make when sourcing an EBCS are as follows. Does the unit provide better boost control? In most cases, yes it will. Do I need the unit for my specific setup? This really depends on your goals for the vehicle. Like with most things, it’s a worthwhile discussion to have with your preferred tuner. That being said, we will always recommend an EBCS on any setup. It’s simply an immense amount of value-added for being relatively inexpensive and simple to install.
Tuning changes for an aftermarket EBCS generally revolve around updating the solenoid frequency based on the manufacturer’s recommendation as well as adjusting wastegate duty and P/I gain values, as necessary. Since the OEM EBCS is set to run at 10-15 Hz, other units may require either a higher or lower frequency, depending on what the manufacturer recommends.
For an EBCS, we recommend the GrimmSpeed boost controller. This unit features a DC12V 5.4W MAC 3-port solenoid and provides noticeably better boost control and greater consistency overall. This is absolutely one of our top recommended modifications on any VA WRX build sheet. Do note that, for Canadian vehicles manufactured in 2017-2018 with a cast aluminum OEM turbo inlet, your EBCS fitment may vary. You can check them out using the link(s) for GrimmSpeed Electronic Boost Control Solenoid (ALL 2015-2021) and GrimmSpeed Electronic Boost Control Solenoid (CDM 2017-2018).
Turbochargers
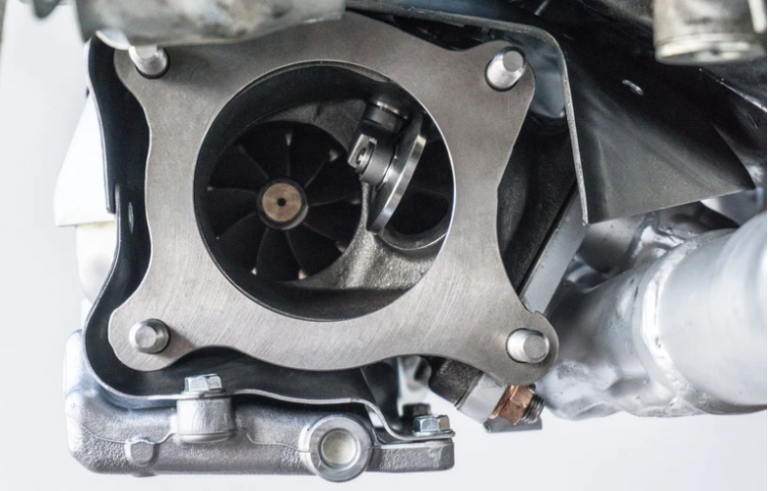
A turbocharger is the focal point of the FA20DIT. It uses exhaust flow to drive a turbine. That turbine is connected to a compressor. That compressor creates a vacuum that pulls air from the intake into the engine. More air allows for more fuel and more power. The factory turbocharger is designed for low to mid-range performance and does suffer at the top end as a result. However, for most builds under 400 hp (horsepower), the OEM turbocharger will perform well enough. This is especially true for pump fuel setups where we will be limited by detonation, not airflow. For ethanol setups, we may actually find that we are power limited by our factory turbocharger.
Some key considerations to make when sourcing a turbocharger are as follows. Does the unit fit the stock location? Depending on your build, this may or may not be ideal. What are the flow characteristics of the turbocharger? This will change how and when your engine produces torque. Larger turbochargers will take a bit more time to begin producing usable torque. There are many other considerations to make when sourcing a turbocharger for your engine. However, it is always best to discuss your goals with your preferred tuner and decide, from there, which turbocharger setup is best for your specific situation.
In general, tuning on an aftermarket turbocharger is relatively similar to tuning on a stock unit. There are simply different targets to reach different points in the torque curve. Typically, the larger the turbo, the more air it can supply over a period of time. The added rotational inertia of a larger compressor also means more lag and more resistance to acceleration and deceleration. Fuel delivery may need to be augmented to support the extra airflow and other engine components may need to be upgraded to facilitate healthy engine operation under more stressful conditions.
For a turbocharger, we recommend the BoostLab TD06. This unit fits the stock location and is rated for 500 hp. This turbo will provide plenty of airflow to reach the theoretical fueling limitations of the OEM fuel system when applying a >60% ethanol blend. You can check it out using the link(s) for BoostLab TD06SL2-54X Turbocharger.
Intercoolers / Charge Pipes
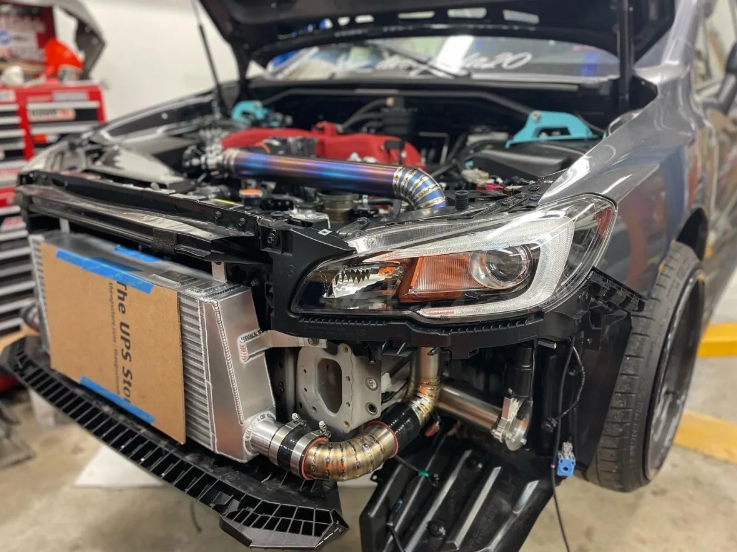
An intercooler is fundamental to any forced induction setup. It serves the purpose of cooling incoming charge as it makes its way from the turbo to the intake manifold. For most applications, an air to air intercooler will be used, wherein cool atmospheric crossflow extracts heat from the charged transverse flow produced by the turbocharger. Cold charge is a high priority for turbo applications as it helps increase the density of the inflow and reduces the combustion temperature and chances of detonation. The charge pipe serves as the medium through which air flows from the turbocharger to the intercooler. The OEM TMIC (Top Mount Intercooler) works well for its daily driving intention. However, there is a major drawback. Back to back pulls and heavy abuse quickly produce damaging heat soak which can lead to detonation. As a result, a richer AFR and a well-tapered boost curve are two examples of ways that a tuner can help combat intercooler inefficiency.
Some key considerations to make when sourcing an intercooler and charge pipe are as follows. Top Mount vs Front Mount? A TMIC will usually do the job for most applications. However, a FMIC (Front Mount Intercooler) will offer a few additional benefits: Increased surface area and volume, more consistent charge temps, heavy abuse protection, and the ability to avoid engine bay heat soak, to name a few. Will the charge pipe and TMIC fit together? Ideally, a charge pipe and TMIC should be sourced together and from the same manufacturer to ensure optimal fitment. An intercooler is the epitome of “you get what you pay for” seeing as some cheaper intercoolers perform only slightly better than the factory unit. Be wary of this and spend your money wisely.
Installing an intercooler and/or charge pipe requires no general tuning changes. However, the benefits come from being able to lean out the AFR and increase the boost. That being said, if you’d like to experience less heat soak and the general benefits of a more robust cooling system, you can simply bolt it on and go. However, it may be smart to consult with your preferred tuner to ensure that no vacuum leaks have developed during the installation process.
For a top mount intercooler and charge pipe combination, we recommend the GrimmSpeed intercooler. This has been proven to be a consistent and robust unit, perfect for the daily or spirited driver. For a front mount intercooler, we recommend the GrimmSpeed unit. Keep in mind that, if you have an aftermarket intake manifold, you may need to source a different intercooler that can support a different throttle body location. As always, the larger the core, the more effective the ambient airflow will be. However, there will also be more volume for the turbocharger to fill. This is why a massively oversized intercooler can actually be a detriment to a moderate build. Whatever path you follow, just be sure to protect the intercooler fins from road debris and other potential damage. You can check them out using the link(s) for GrimmSpeed Top Mount Intercooler and GrimmSpeed Front Mount Intercooler.
Intake Manifolds
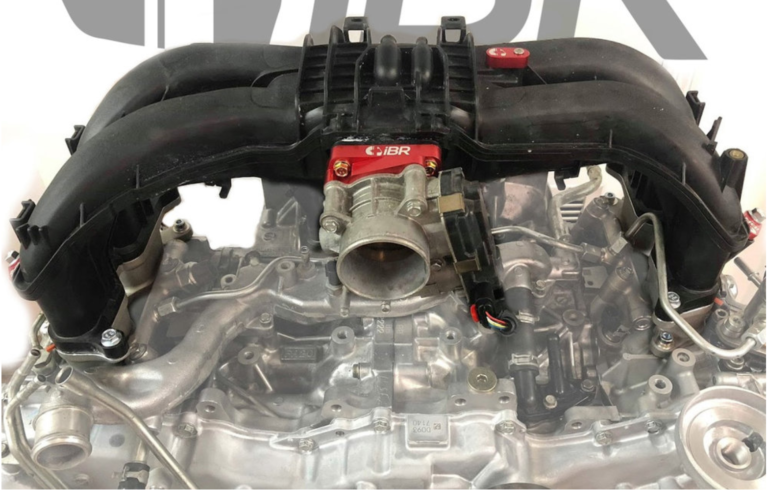
A cleverly designed intake manifold can make or break airflow to the engine. It serves as the distribution hub that sends incoming charge where it needs to go. In some applications, an intake manifold can also allow the user an opportunity to exceed factory fueling limitations via secondary fuel injection. For most applications, the OEM intake manifold will meet airflow and distribution needs. However, there can be some dramatic benefits to upgrading to a more stout unit – specifically when it comes to top-end flow.
Some key considerations to make when sourcing an intake manifold are as follows. Do my power goals require one? In most cases, no. However, on bigger builds, they may provide better flow characteristics. Do I need to introduce port injection? This is the main reason why people opt for an upgraded intake manifold. Since there is not currently much support for DI (Direct Injection) component upgrades, PI (Port Injection) seems to be a good solution for some applications. Breaching fueling limits is something best discussed with your preferred tuner. The OEM FA20DIT fuel system is capable of around 450 HP before secondary port injection should be considered.
In general, the tuning process for an aftermarket intake manifold is not too different from that for an OEM manifold. However, there will be noticeable deviations in boost response versus the commanded wastegate duty cycle. This needs to be accounted for to ensure that the ideal boost targets are continually being met.
For an intake manifold, we recommend the IBR (I Build Racecars) BRZ manifold. This unit can help achieve the power goals you most likely have. Keep in mind that different cold-side intercooler piping may need to be sourced depending on the specific application, as previously mentioned in the “Intercoolers / Charge Pipes” section of this article. You can check it out using the link(s) for IBR BRZ Intake Manifold.
Tumble Generator Valves
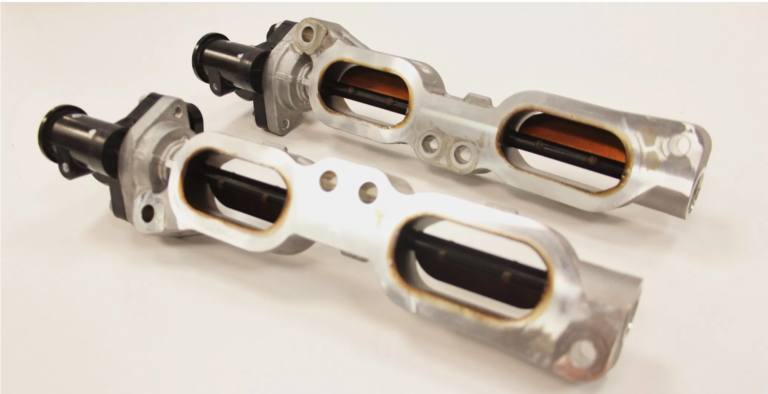
TGVs (Tumble Generator Valves) are emissions components that serve the purpose of tumbling the charge as it enters the cylinders. This helps facilitate a more complete combustion as well as aiding in cold start conditions. However, these systems also cause a bottleneck in the intake tract and do disturb airflow, especially at high load. They also activate under certain cruising conditions which can lead to periodic cruise and tip-in detonation as well as other non-ideal operating conditions. Ultimately, elimination of this system is critical to extract the most performance from your engine. However, do understand that there will be some drawbacks to removing this system, especially when it comes to emissions compliance, post-start fuel enrichment, and achieving complete combustion under certain circumstances.
Some key considerations to make when sourcing a TGV housing kit are as follows. Will I pass emissions? Depending on your area and laws, this may be something to consider. I recommend looking into local emissions guidelines before making the choice to remove your TGV system. Uppers, lowers, or both? For vehicles that see off-road use only, the recommendation is to opt for a full TGV housing as opposed to only an upper or lower one. This will yield the best benefits despite costing a bit more than a traditional upper TGV housing kit. A full kit will also contain less points of potential seal failure which can cause a vacuum leak. Depending on the TGV housing you purchase, we recommend either keeping or removing the intake tract dividers that fit below the lower TGV housing before reassembly. For port-matched housings, it is important to keep the dividers intact. The opposite is true for non port-matched housings. The removal of these dividers has not proved to provide any additional benefits or drawbacks.
Removing an OEM TGV system requires a few tuning changes for off-road vehicles. This revolves around modifying the OEM TGV compensations in order to facilitate optimal engine operation within the newly defined parameters. Do note that emissions compliance is not possible after the removal of OEM TGV hardware.
For a TGV housing kit on an off-road vehicle, we recommend the IAG full housing. This replaces both the upper and lower OEM TGV units with port matched CNC’d runners for absolutely optimal flow. We recommend, with this setup, to replace the OEM intake runner dividers before reinstallation. You can check it out using the link(s) for IAG Full TGV Housings.
Exhaust Gas Recirculation
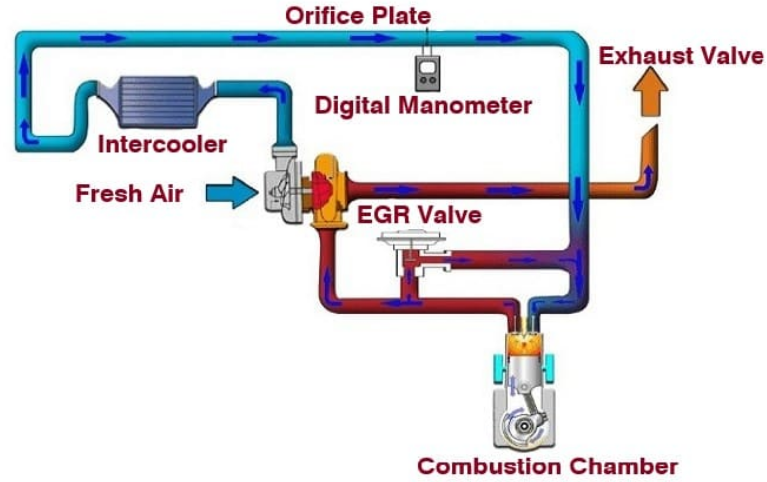
EGR (Exhaust Gas Recirculation) works by recirculating a portion of an engine’s exhaust gasses back to the engine’s cylinders. This dilutes the oxygen in the incoming air stream and provides inert gasses to act as absorbents of combustion heat to reduce peak in-cylinder temperatures. Nitrogen oxides are produced in high temperature mixtures of atmospheric nitrogen and oxygen that occur in the combustion chamber – this typically occurs at peak cylinder pressure. Another primary benefit of external EGR valves on a spark ignition engine is an increase in efficiency, as charge dilution allows a larger throttle position and reduces associated pumping losses. It is also important to note that, in a gasoline engine, this inert exhaust displaces some amount of combustible charge in the cylinder. This effectively reduces the quantity of charge available for combustion without affecting the air-fuel ratio.
The main considerations to make when tampering with your vehicle’s OEM EGR system is as follows. Will I pass emissions? Depending on your area and laws, this may be something to consider. We recommend looking into local emissions guidelines before making the choice to remove your OEM EGR system.
Removing an OEM EGR system requires a few tuning changes for off-road vehicles. This revolves around modifying the OEM EGR compensations in order to facilitate optimal engine operation within the newly defined parameters. Do note that emissions compliance is not possible after the removal of OEM EGR hardware.
For an off-road vehicle, the OEM EGR system can simply be unplugged, if the user decides to go that route. However, we do not recommend this, as the vehicle will no longer be emissions compliant.
Built Blocks

For bigger builds, the power capacity of the stock block and internals may be reached. In this case, an upgraded internal setup will be required. Torque is typically capped at 350 WTQ (Wheel Torque) in order to preserve the integrity of the engine internals. OEM FA20DIT connecting rods are especially thin to help reduce oscillating mass and increase engine efficiency. As a result, they are the weak point in many cases. An engine build can also help increase the durability of other internal components, such as the pistons or the crankshaft, without sacrificing engine cooling and the amount of power that can safely be made. An upgraded valvetrain may also be a worthwhile consideration for some applications. However, we will not be discussing that topic in this editorial.
The only key consideration to make when sourcing a built block is as follows. What are the power goals? You should source your internals or engine package based on your goals. Certain setups will be rated for specific power levels. However, It’s usually a good idea to over-build, as it can save you a lot of money in the long run.
In general, there are no required tuning changes when working with an aftermarket engine block. However, there is typically a bit more room for error. Caution should still be used, however. Built engines are not bulletproof and pushing an aggressive map onto any component, upgraded or not, can be catastrophic.
For an engine build, we recommend browsing the offerings from IAG and seeing which package best meets your requirements. We would advise against replacing internals only. Unless you really know what you’re doing and have the tools to support the process, leave the guesswork and assembly out of the equation – you’ll thank yourself later. You can check them out using the link(s) for NPR Built Short Block Offerings.
Downpipes
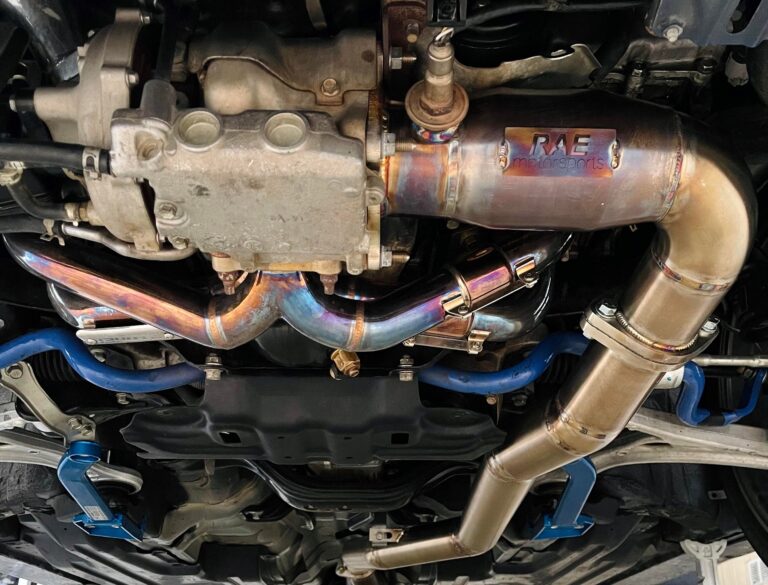
As the primary exit point of air from your turbocharger, the downpipe is tasked with diverting exhaust flow away from the turbo as quickly and efficiently as possible. Air can only enter the engine as quickly as it can exit it. For this reason, a free-flowing downpipe is integral to optimal engine performance. However, the downpipe is also a critical emissions component, as it houses the catalyst. The catalyst uses a combination of platinum and rhodium to facilitate oxidation to remove nitrogen atoms from nitrogen-oxide molecules in order to reduce harmful emissions. The OEM downpipe houses one catalyst and one resonator but features less than optimal geometry.
The only key consideration to make when sourcing a downpipe is as follows. Will I pass emissions? Depending on your county and laws, this may be something to consider. I recommend looking into how your area conducts emission testing before making the choice to modify your downpipe and/or catalyst. For off-road vehicles, the consideration to remove a catalyst can be made. However, setups like these often see poor boost control as a result of a significant loss in back pressure.
Upgrading the downpipe does require a few tuning changes. For most applications, the wastegate duty cycles will need to be re-calibrated in order to account for the loss in back pressure. We may also benefit from a decrease in wastegate solenoid frequency, to allow us to reach our boost target more smoothly and consistently.
For a downpipe, we recommend one equipped with a GESI catalyst from Rae-Motorsports. Not only are these downpipes emissions compliant, but they also offer superior build quality and excellent flow characteristics. Rae-Motorsports makes all of their downpipes by hand, right here in the USA. As a result, these units boast a superior fit and finish. The GESI catalyst is also high-flowing, yet incredibly efficient at converting pollutants. You can check it out using the link(s) for Rae-Motorsports Catted Downpipe.
CAT-BACK EXHAUSTS / MUFFLER DELETES
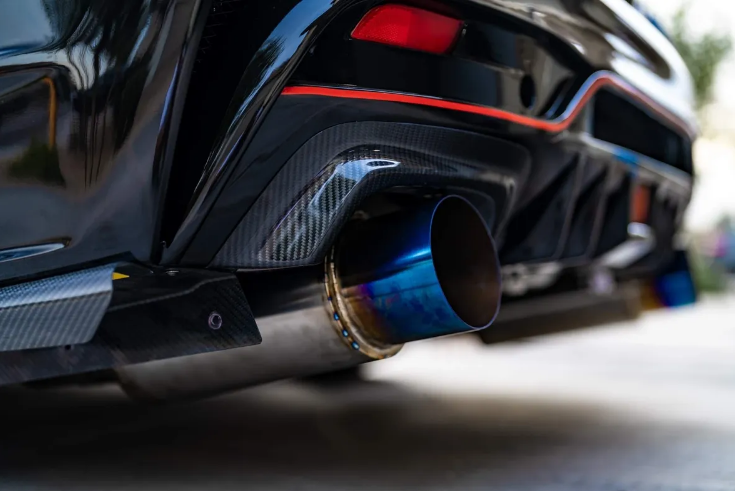
Post catalyst exhaust components simply alter the sound characteristics of the exhaust as well as removing excess weight. However, a more free-flowing midpipe may net some positive throttle response as well. The OEM cat-back exhaust includes a non-resonated midpipe and two mufflers.
Since post catalyst components do not have a noticeable effect on performance, the only considerations would be your own audible and visual approval, as well as potential weight savings. However, it doesn’t hurt to stick with a name brand so as to preserve build quality, material choice, and fitment.
Installing a CBE (Cat-Back Exhaust) or muffler deletes requires no general tuning changes.
Regardless of what kind of look and sound you are going for, we religiously recommend Rae-Motorsports as our one-stop shop for everything exhaust related. Whether you’re after something quiet and tame or something loud and aggressive, they have got you covered. Rae-Motorsports also offers everything from single-exit to quad-tip mufflers to perfectly suit your particular style. You can check them out using the link(s) for Rae-Motorsports Cat-Back Exhaust Systems.
AIR-OIL SEPARATORS

An AOS (Air-Oil Separator) or catch cans serve the purpose of keeping blow-by and oil out of the intake tract and engine. As a result, installing one can help prevent carbon buildup, exhaust smoke, and detonation. It’s one of the most helpful supporting modifications out there for the FA20DIT and highly recommended by tuners and engine builders alike.
Some key considerations to make when sourcing an AOS are as follows. Is a maintenance free experience important? Then an AOS is preferred over catch cans. What are the power goals? That will determine what type of AOS to install.
For any type of recirculating AOS, there will be no tune required. This is because the factory PCV (Positive Crankcase Ventilation) functionality is retained. For any VTA (Vent To Atmosphere) AOS, tuning changes may be required to account for changes made to the PCV and charge return systems. In either case, it is best to discuss the available options with your preferred tuner.
For an AOS, we recommend the IAG street series unit for any engine build below 600 hp. For anything over 600 hp, we recommend the IAG competition series unit. This is per IAG and not based on personal preference. Simply put, higher horsepower engines require extra vapor exhaustion. This is why a VTA setup can be beneficial for bigger builds. Otherwise, a vapor recirculation system is more practical, specifically when it comes to ethanol applications. For catch cans, we recommend the Radium unit. It seems to be the most consistent and the most effective overall at keeping oil and vapors out of the intake and engine. You can check them out using the link(s) for IAG Street Series Air-Oil Separator, IAG Competition Series Air-Oil Separator and Radium Dual Catch Cans.
POWERTRAIN / DRIVETRAIN BRACING
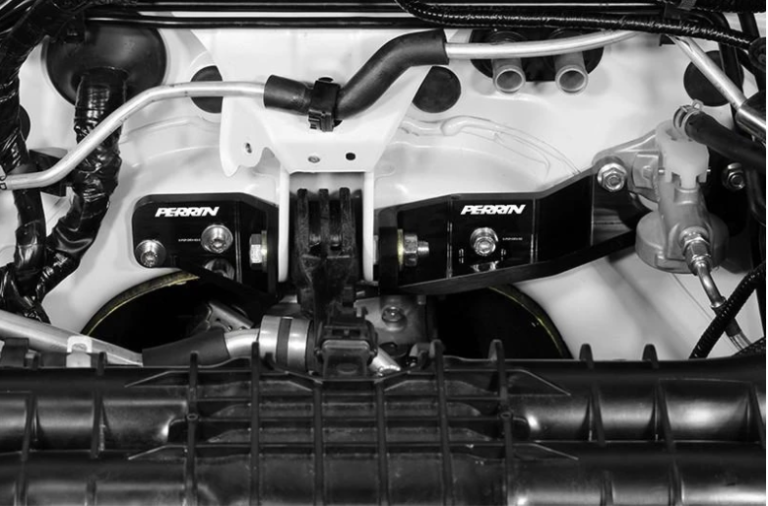
When adding power, it’s always important to understand how the chassis will respond. Most factory support components were designed with specific loading thresholds in mind. When these thresholds are exceeded, the added stress can cause OEM components to fail either abruptly, or over time. Since every build is different, we recommend contacting your preferred tuner when deciding what supporting mods are best for your specific situation.
Some key considerations to make when sourcing aftermarket bracing are as follows. What are the power goals? The more power you make, the more reinforcement will be required. How will the car be driven? Daily drivers will not require the same supporting modifications as race cars will. Extra bracing will typically make the car more noisy and less comfortable, especially on long trips. To better understand what components are best for you, contact your preferred tuner or even a trusted vendor.
For chassis bracing, we recommend the following upgrades depending on your situation: Perrin pitch stop mount and pitch stop brace kit. These two modifications can help redistribute the bending moment between the engine and the transmission to other parts of the vehicle’s frame. This can help prevent components from being damaged due to elevated levels of loading stress. The Pitch Stop Brace Kit also comes with a stainless steel clutch line that can help facilitate positivity in both clutch feel and engagement. You can check them out using the link(s) for Perrin Pitch Stop Mount and Perrin Pitch Stop Brace Kit.
Suspension Upgrades
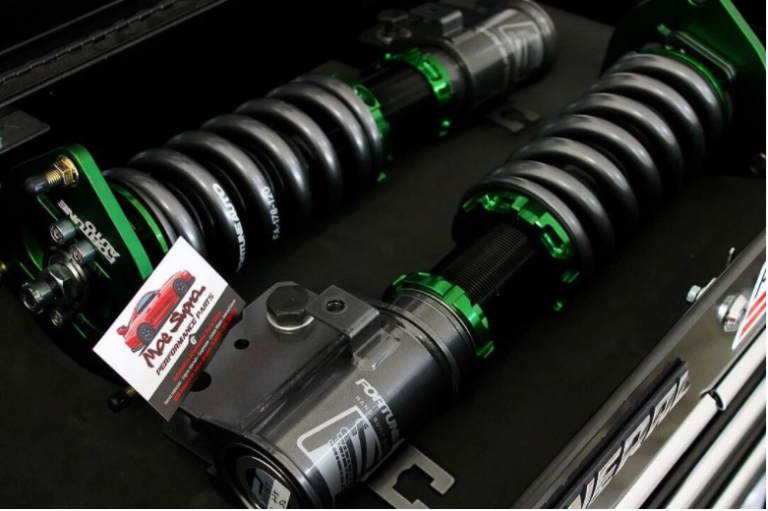
Suspension is what will keep your tires in contact with the road. As a very complex subject, suspension setup will completely rely on your vehicle’s intended use, your preferences, your driving style, and many other factors. A good suspension setup is well thought out and proven under certain conditions. As with most things, functionality is fundamental and looks should come second. Your safety and your vehicle’s cornering performance should always be a top priority when upgrading or changing suspension components.
Some key considerations to make when sourcing suspension are as follows. How will the car be driven? Daily drivers and race cars will require vastly different setups. Depending on your intentions, different combinations of spring rates, ride heights, and dampening may be necessary. Do I require on the fly adjustability? If so, air suspension may be your best bet. Air ride cannot match the functionality of a well dialed-in coilover setup. However, for certain applications, the versatility of air ride is simply unmatched. Can I simply get lowering springs and call it a day? Many people have seen success with a lowering spring setup. However, I would advise against it. OEM struts were designed to work optimally with OEM springs. When you change those springs out, you not only put the OEM struts outside of their intended damping zone, but you also put transfer stress and impulses through the struts during operation. This will typically lead to poor suspension performance and premature failure of the struts. Nevertheless, if you pair a lowering spring with an aftermarket strut that was designed to dampen optimally with said spring, this could potentially be a more cost-effective solution for you, depending on the application.
For a coilover setup, we recommend something from Fortune Auto. They have been in the business for a very long time and only release a new product once it has been extensively simulated and road tested. They are also the pinnacle of price for performance and are widely known for being one of the best “bang for your buck” options out there. For air suspension, our knowledge is fairly limited. In either case, It is best to contact a suspension or fitment specialist regarding what setup is best for your situation. You can check it out using the link(s) for Fortune Auto 500 Series Coilovers.
Braking upgrades
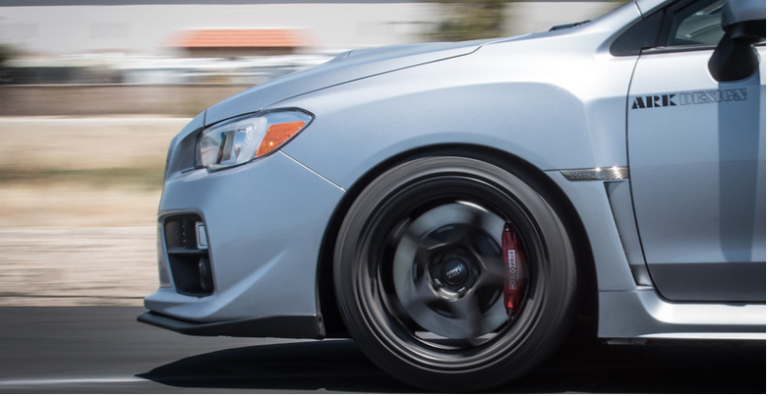
After adding all that power, you’ll need some extra help slowing down. The factory brakes are sufficient for daily driving. However, under heavy or extended use, there are a few major concerns. The brake pads will fade, the rotors will warp, the lines will expand, and the fluid will boil. All of these things can lead to a substantial decrease in braking performance and a potentially dangerous situation.
The only key consideration to make when sourcing braking components is as follows. How will the car be driven? Daily drivers and race cars will require vastly different setups. Depending on your intentions, different combinations of pads, rotors, lines, and fluid may be necessary. The level of heat capacity and wear characteristics will also come into play when determining what upgrades are best for your specific situation. Braking setups vary across different racing disciplines from Autocross to Time Attack and everything in between. In most cases, it is best to consult with someone who has on-track experience before making any expensive brake purchases.
Do not be fooled by fancy designs in brake rotors. Drilled or slotted rotors may look nice. However, they may not be the best option in some cases. While slotted rotors can aid in the disbursement of brake dust, drilled rotors offer few inherent benefits over well-designed blank rotors. At the same time, most track day enthusiasts often opt for blank rotors as they are the cheapest to replace when the time comes. Take all of these factors into consideration and contact a trusted vendor to identify what rotor setup is best for your specific situation.
As far as brake pads go, there are plenty of considerations to make. Different brake pads will produce different amounts of stopping power, different noise and dust levels, and different longevity characteristics. Too aggressive of a pad on a streetcar will create excess dust and noise. Too docile of a pad on a track car will result in brake fade or accelerated wear. At the same time, pads should be sourced with rotors in mind. Too aggressive of a pad on a street rotor can lead to the rotors warping or delaminating. This directly effects not only the performance of your braking system but the longevity of the components as well.
Regarding brake lines and fluid, traditional rubber lines will expand as pressure and heat build in the braking system. This can result in a negative pedal feel and a decrease in maximum braking pressure. At the same time, boiling brake fluid reduces the fluid’s ability to remain incompressible and extract additional heat. For these reasons, selecting a fluid that can resist boiling and lines that can resist volumetric expansion are critical in maximizing your braking performance. This is especially important when it comes to high-stress situations, such as track time and autocross.
For braking setups, we recommend Hawk pads, DBA rotors, StopTech lines, and ATE-200 fluid, or perhaps a big brake kit from your preferred manufacturer. Since brakes function by transforming kinetic energy into heat via friction, heat extraction should also need to be considered. This can be addressed via brake ducting or other methods of increasing the flow of clean air over the braking surface(s). In any case, It is best to contact a braking specialist, or a trusted vendor, regarding what setup is best for your specific application. You can check them out using the link(s) for Hawk HPS 5.0 Brake Pads, DBA 4000 Series T3 Brake Rotors (Front), DBA 4000 Series T3 Brake Rotors (Rear), StopTech Braided Brake Lines (Front), StopTech Braided Brake Lines (Rear), ATE TYP 200 DOT-4 Brake Fluid, and Big Brake Kits.
Transmission Swaps

The transmission is the essential assembly that transfers power from the engine to the wheels. The OEM split-case 6-speed cable-style transmission in the VA WRX is perfectly capable in most cases. However, under heavy abuse or high torque applications, problems may arise and components may fail prematurely.
When debating a transmission upgrade, bear in mind the torque goals. Some transmissions aren’t designed to handle well over factory power levels. Some transmissions aren’t meant to handle aggressive driving at factory power levels. All of these factors come into play when deciding what transmission is best for your specific situation.
In any case, if a transmission upgrade becomes a necessity, the best option is usually to source a 6-speed linkage-style drivetrain swap from a VA STi. Certain gears in the STi transmission are considerably thicker than their split-case counterparts; this aids both in power delivery and longevity. Seeing as most components are drop-in ready, there is typically no better way to ensure power is transferred safely to the ground.
Clutch Upgrades

The clutch is a critical power transmission component as it regulates the torque delivery to the transmission. In most situations, the OEM clutch is perfectly sufficient. However, if the vehicle sees frequent launches, heavy abuse, or an abundance of extra torque, the factory clutch may begin to slip.
As a calibration company, we have seen many clutches fail when torque rises well above factory specifications. It’s not as much a matter of if, but a matter of when. We always recommend installing a clutch that can handle 25% more torque than what it will be subjected to. This will ensure a sufficient factor of safety on all torque transfer components.
With so many solid clutch options out there, it’s really best to contact your preferred tuner, or a trusted vendor, when sourcing an aftermarket clutch, flywheel, or combination of the two. Just make sure that the components are rated above the amount of torque you plan on producing. That way, you can ensure longevity of the assembly in all circumstances and situations. Do bear in mind that, after clutch failure, the flywheel will likely need to be resurfaced or replaced, depending on the severity of the slippage endured. While you’re in there, you may as well also upgrade the throw-out bearing, snout, and/or shift fork to save yourself the headache down the line. You can check them out using the link(s) for Upgraded Clutch Kits and NPR Bearing, Snout, and Fork Bundle.
ETHANOL SENSORS
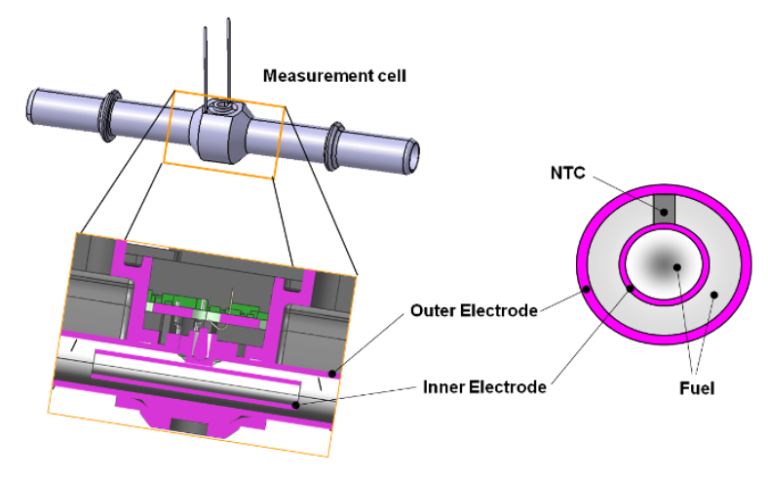
The ethanol sensor is the component that measures ethanol content in the fuel system. It is responsible for ensuring that the ECU understands ethanol content in order to properly adjust the flex-fuel calibration on the fly. There is currently no factory option for an ethanol sensor. However, there are many aftermarket options available.
An ethanol sensor works by allowing the fuel to flow through the gaps between the inner and outer electrodes as an AC voltage is applied to the electrodes. The relative permittivity of the fuel changes with the ethanol content, which leads to a change in the capacity accordingly. As the capacitance increases with increasing ethanol content, the oscillation frequency in the system will decrease and vice versa.
The analog frequency output is tied to a microprocessor which determines the capacitance by working backward from the measured frequency. Due to the correlation between ethanol’s permittivity and the fluid’s temperature, the microprocessor corrects the capacitance for temperature variations in the fuel according to the output from an NTC (Negative Temperature Coefficient) thermistor. In addition, errors caused by the different conductivities of gasoline and ethanol are corrected.
The frequency of the single-wire output of the microprocessor to the ECM indicates the percentage of ethanol in the fuel. If required by the OEM the pulse width of the signal will indicate the fuel temperature. The ECM adjusts the injection according to the blend of the fuel, which leads to stoichiometric combustion.
Installing an ethanol sensor does require a few tuning changes. The sensor must be activated and properly calibrated before it can be used and trusted for accurate readings. Depending on how the sensor is wired, changes may need to be made to mirror TGV outputs from one bank to another in order to preserve OEM TGV capabilities. One may also want to utilize COBB’s custom sensor settings to more easily monitor sensor activity for troubleshooting purposes.
For an ethanol sensor, we recommend opting for a fully kitted flex fuel setup. Currently, we favor the kit that is offered by Delicious Tuning. We recommend this kit for two reasons. One – the kit includes an option fuel pressure sensor add-on. This can detect fuel pump failure, a possible occurrence when using ethanol, before it causes irreversible engine damage. And two – there is an integrated BlueTooth feature that allows the user to read ethanol content and other parameters via a mobile device app. You can check it out using the link(s) for Delicious Tuning Flex Fuel Kit.
LOW-PRESSURE FUEL PUMPS

The LPFP (Low-Pressure Fuel Pump) is responsible for drawing fuel from the fuel tank towards the engine. The factory LPFP does not support ethanol usage in saturations greater than 10%.
A LPFP works by first drawing fuel into the pump through an inlet tube and filter system. The fuel then exits the pump through a one-way check valve which maintains residual pressure in the system when the pump is not running and is pushed toward the engine through the fuel line and filter. The fuel filter traps any rust, dirt or other solid contaminants that may have passed through the pump. Fuel then flows towards the engine.
Installing an aftermarket LPFP requires no general tuning changes.
For a LPFP, we recommend the AEM unit in conjunction with the DW Installation Kit. This is simply the kit that has the least history of functionality issues. You can check it out using the link(s) for AEM 340 LPH Fuel Pump + DW Installation Kit.
HIGH-PRESSURE FUEL PUMPS
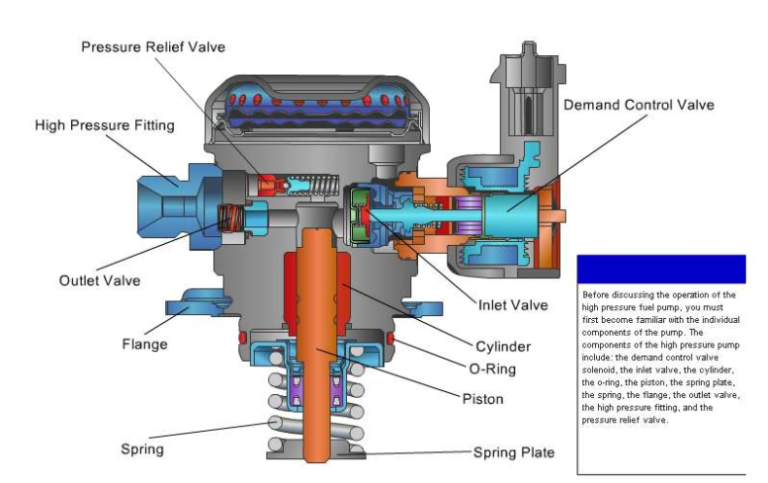
The HPFP (High-Pressure Fuel Pump) is responsible for pressurizing the fuel and forcing it into the engine. The factory HPFP does not support ethanol usage in saturations above 60%. Even with ethanol saturations below 60%, it is always advised to cycle a full tank of pump fuel for every two tanks of the preferred ethanol blend. This will increase the lifespan of the HPFP.
High-Pressure fuel pumps are mechanical and are typically driven by a camshaft. A lobe on the camshaft pushes a follower or roller that moves a piston. The piston in the pump has two cycles, suction, and compression. The solenoid on the side of the pump controls how much fuel is compressed during the compression stroke. During the suction cycle, the solenoid will allow fuel from the low-pressure side of the fuel system to enter the pump. As the piston starts to travel upwards, the solenoid will remain open. The fuel is then pushed into the low-pressure side of the fuel system when the solenoid is open. When the solenoid is closed, the low-pressure and high-pressure sides of the fuel system are isolated.
If there is a small load on the engine, the solenoid will remain open longer and a smaller amount of fuel is compressed. If there is a large load on the engine, the solenoid will close sooner and a higher volume of fuel will be compressed. The length of time that the solenoid remains open will determine how much fuel reaches the injectors.
On some platforms, an upgraded HPFP will require amendments to the fuel angle calibration. However, that is not the case on this platform. In this case, installing a HPFP does not require any tuning changes. Do keep in mind that ethanol does require tuning changes, and the benefits of an upgraded HPFP likely won’t be seen without use of ethanol.
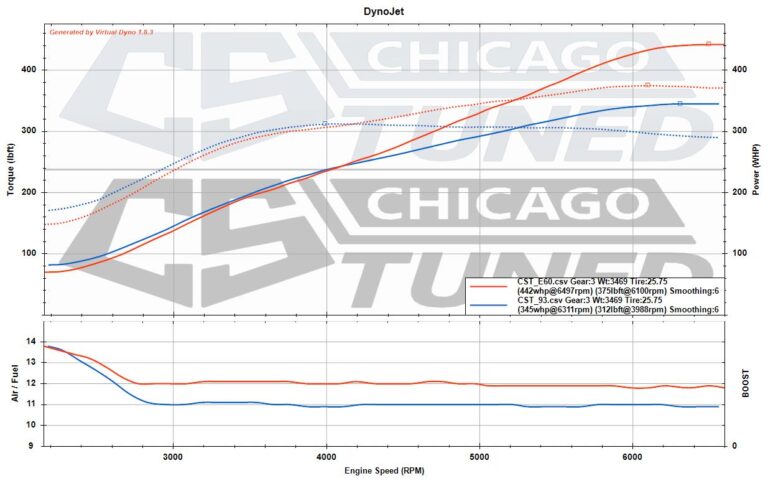
For a HPFP, we recommend the Nostrum unit. This component is useful to anyone interested in utilizing full E85 or 85+% ethanol blends in their vehicle. This eliminates the inconvenience of having to blend ethanol and pump fuel manually. However, the power difference between two identical setups, one using E60 and one using E85, is minimal. You can check it out using the link(s) for Nostrum Fuel Pump.
Alternative Fuels
Methanol

Methanol injection is the process through which an atomized mixture of water and methanol fuel is injected into your engine’s intake tract. This offers multiple benefits including, but not limited to: increasing octane, reducing EGT (Exhaust Gas Temperature), and suppressing detonation.
Methanol is typically introduced immediately before the throttle body by means of an injector. The injector is controlled via a control unit that has a built-in pressure sensor and multiple controls. The user typically has control over what parameters must be met in order for the injector to activate and deactivate. On most systems, the amount of injected methanol blend is controlled by a jet device that goes in the injector nozzle, and then into the intake system.
While the benefits of methanol injection can be substantial, we will not be discussing methanol further because our experience with it is extremely limited. For additional questions about methanol injection, please contact your preferred tuner.
Ethanol
Ethanol is derived from corn whereas gasoline is derived from petroleum. In fact, ethanol was originally mixed with gasoline in an effort to make the mixture non-potable! Ethanol contains less energy per unit than gasoline does. This results in a reduction in fuel economy. It also doesn’t provide the same lubricating qualities that gasoline does which results in excess wear on fuel system components such as the high and low-pressure fuel pumps. However, these downsides are heavily outweighed by the many upsides of running ethanol.
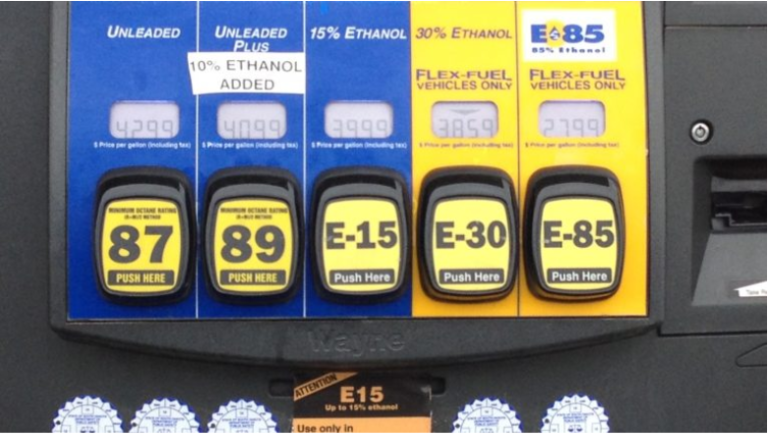
Octane Boost: Ethanol provides a sufficient boost in octane when mixed with gasoline. The process of mixing ethanol and gasoline together is called blending. Typically, pump gasoline sits somewhere between 0% and 10% ethanol content. This solely depends on the provider and distributor. Pump E85 typically sits between 51% and 83% ethanol content. This depends on the provider, distributor, geography, and season. Depending on specific content and mixing ratios, one can theoretically achieve any ethanol content between 0% and 83% depending on the factors mentioned above. As this percentage increases, so do the pros and cons of ethanol in your vehicle. It is also worthwhile to mention that purer forms of ethanol (>83%) can be sourced as well although it is typically not sold at public fuel stations.
Combustion Temperature: Because ethanol has a lower BTU (British Thermal Units) value than gasoline, it actually burns slightly colder than gasoline does. This adds more knock resistance and fortifies the benefits of something like a larger intercooler. For this reason, ethanol is a very enticing fuel for any vehicle that sees heavy abuse, such as a race car.
Flex Fuel: Another benefit of ethanol is the ability to program a flex-fuel setup on your vehicle. Flex-fuel is the ECU’s ability to determine and adjust a set of parameters based on measured ethanol content. It’s essentially an infinitely changing calibration that will adapt to fit whatever ethanol content you choose to throw at it (within a predetermined range). Needless to say, flex-fuel is the most common application for ethanol on the FA20DIT and that’s mostly down to the versatility and reliability of the setup.
Tuning: Due to the energy deficit per unit of ethanol vs gasoline, the stoichiometric ratio maintains an inverse relationship with ethanol saturation. As a result, more fuel volume is required to achieve the same combustion. For most cases, this is achieved via injector scaling. For the same reason, cranking and enrichment tables must be augmented to suit. With ethanol, the extra knock protection allows a tuner to optimize every part of the combustion process. Fueling can be leaned out. Ignition can be advanced. Boost can be increased. All of this, and more, come together to increase both power potential and reliability.
Conclusion
Thank you for reading our Op-Ed on the 2015+ Subaru WRX platform! We do hope you enjoyed reading this series as much as we enjoyed publishing it. Please reach out to us if you have any questions or would like more insight on any of the topics discussed above.
Cheers!
– Clint
